Mass Export Events:
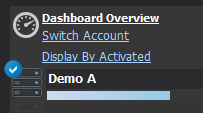
At your dashboard, click your backup bridge (Ex: left of 'Demo A'):
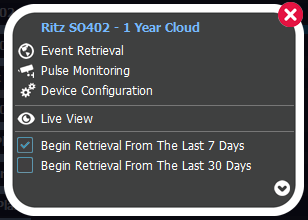
Select 'Event Retrieval':
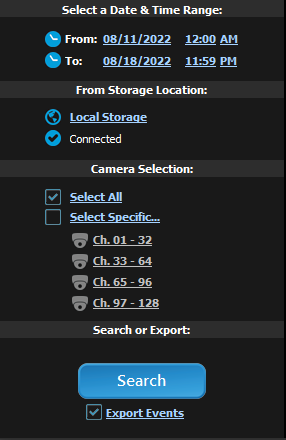
Choose your duration, camera selection, check the Export Events box, and select 'Search':
Export Options:
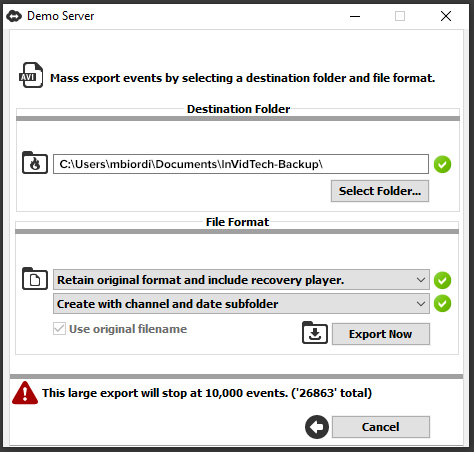
Destination Folder: The folder location of where events will be exported. Files will export to its default folder (C:\Users\username\Documents\Proactive-Backup\LocationName). This default location can be changed under 'Local Settings' --> 'Preferences' --> 'Backup Event Folder Path'.
Select Folder: A prompt will appear allowing you to choose what folder to export files into.
File Format: The format in which files will export as:
Retain original format and include recovery player: Exports original raw file, and will include the backup recovery player as a standalone player. When the export is completed, you have the option to copy that folder onto external media (ex: usb drive), and use the backup recovery player on another PC to access the exported data.
Burn event clip to an avi file format with Xvid compression: Exports to an avi reducing the overall file size, allowing easy distribution (Ex: USB drive, email, dropbox, etc...). Quality reduction is very minimal.
Burn event clip to an avi file format: Exports to an avi without file reduction. Files will be very large requiring adequate hard drive space, and will be very difficult to distribute. It is recommended you use the option above in most cases, when exporting to an avi.
No Subfolders: (Ex: C:\node_name\file.avi).
Create with channel sub folder: (Ex: C:\node_name\file.avi).
Create with channel and date sub folder: (Ex: C:\node_name\ch01\2022-08-18\file.avi).
Create with channel, date and hour sub folder: (Ex: C:\node_name\ch01\2022-08-18\12\file.avi).
Use original filename: When checked, the export will keep the original file name structure already created.
Export Now: Starts the export process.
Cancel: Returns to back to event retrieval without exporting events.
Seleck OK after reading the prompt message regarding the important notice. When files are exporting, you can either minimize or close out of the exporter screen. If you do close, you can access the exporter in the system tray, as it will remain in the background running the export process.
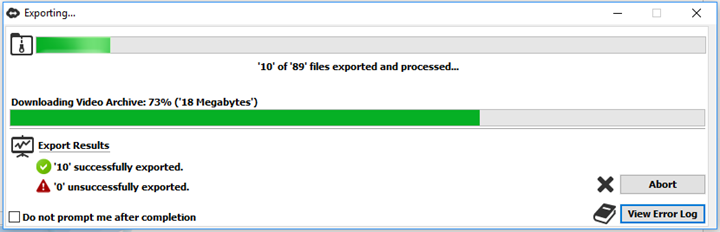
Do not prompt me after completion: When the export task is completed, exit application with no prompt.
Abort: Will cancel the export operation.
View Error Log: Allows you to view and save the error log.
Important Info:
Large exports may display a warning that limits the amount of files to export in a single session. It is recommended during an export, to select a smaller duration in the date range, and/or select specific cameras only.