**Please Note: Cameras Default IP address is 192.168.1.121. IP Utility can be downloaded off our website here
- Log into the cameras web interface on Internet Explorer (IE), default username is “admin” and default password are “1234567u”. Make sure to download the new plugin.
Note: close ALL browser tabs while installing the plugin. - Parameter Configuration (Configuration/Human Thermometer/Parameter Configure)
- Enable face detection
- Draw the area according to the real scenario, there is a maximum of 8 areas supported. We usually use one detection area to cover where people could potentially appear in, recommended distance is 9 to 16 feet (3-5 meters) for capturing.
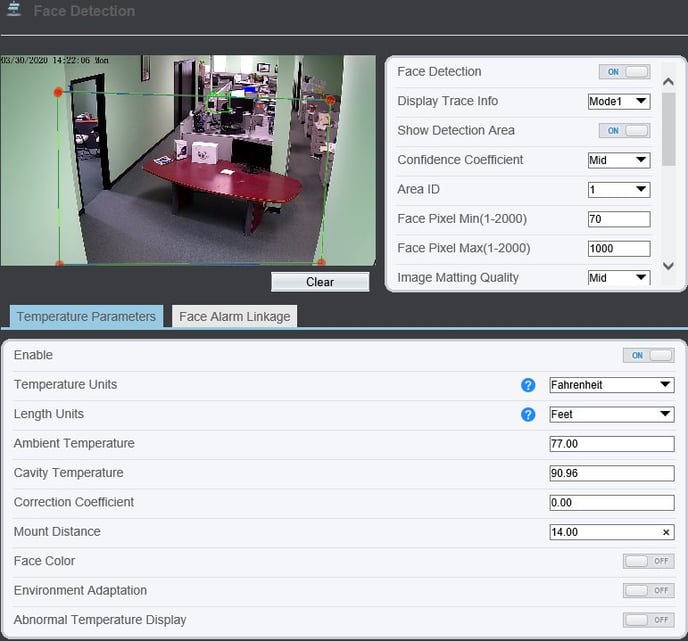
- Leave the Display Trace Info at “Mode 1”
- Show Detection Area, can turn On or Off
- For Confidence Coefficient, we suggest keeping the default value (Mid). It’s for the face matching level with the built-in algorithm.
- Area ID is for the selected areas if you choose more then one main area, up to 8 totals. We suggest keeping this at one and focusing on the main point of entrance.
- For Face Pixel Minimum and Maximum, we suggest keeping the default value (70/1000). Only faces in this range will be detected.
- There are two different Snapshot Modes:
- Timing: ‘upload interval’ is associated with ‘timing’, camera will upload one picture every 5 seconds (Suggested).
- Optical: ‘snapshot count’ is associated with ‘optical’, camera will upload the best face picture in 5 seconds.
-
For Upload Image Interval we suggest leaving at 5 seconds (1-10 second range).
-
For Yaw Degree, Tilt Degree, Pitch Degree and OSD Overlay Snapshot, we suggest keeping as default.
-
FTP Upload Image Matting and FTP Upload Whole Image are if you are using the camera as a standalone device, no CMS or NVR, and wish to save the facial snaps to an FTP.
- Temperature Parameters
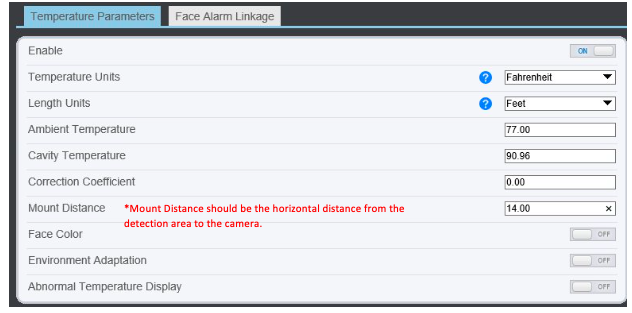
- Enable this field and leave all as DEFAULT except LENGTH UNIT and MOUNT DISTANCE
- IF YOU SWITCH TO FAHRENHEIT THE FIELDS STILL STAY AS DEFAULT (Except Length/Mount Distance, mentioned above)
- DEPENDING ON THE SELECTION OF “LENGTH UNIT” (METERS/FEET), ALL DISTANCE FIELDS WILL BE CONSIDERED IN THOSE UNITS!
[IMPORTANT] Set the mount distance according to the real installation, whose value should be the horizontal distance from the detection area to the camera.
Hit ‘apply’ to save the settings.
- Face Alarm Linkage
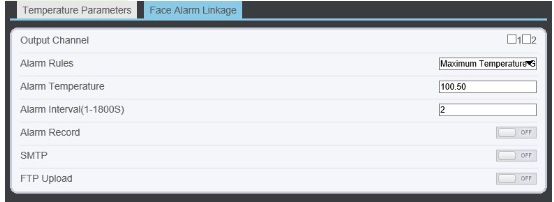
IF SWITCHED TO FAHRENHEIT YOU MUST ADJUST “ALARM TEMPERATURE”, 99.5-100.5F (Default Celsius is 37.30)[
- [IMPORTANT] Thermal Mapping (Configuration/Human Thermometer/Thermal Mapping)
- This step is mainly for matching the thermal image with the visible image, which can ensure the measurement accuracy. The Black Body device (Infrared Calibrator) MUST be in the Field of View of the thermal image. The thermal image is a FIXED LENS and is a smaller field of view then the standard image.
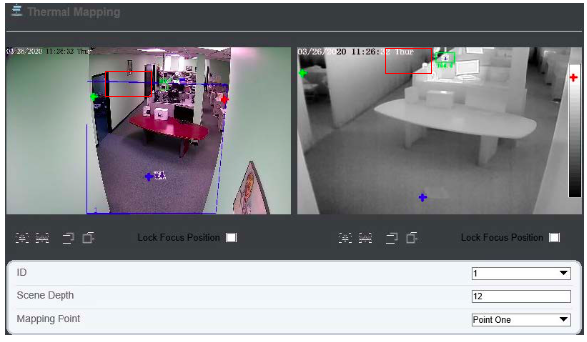
- This step is mainly for matching the thermal image with the visible image, which can ensure the measurement accuracy. The Black Body device (Infrared Calibrator) MUST be in the Field of View of the thermal image. The thermal image is a FIXED LENS and is a smaller field of view then the standard image.
- There are eight groups of ID, and each group ID contains three points. If using One area, then you do not have to set groups 2-8.
- Pick out three points that you can clearly see in the thermal image, mark them with point1, point2 and point3.

- Find the three locations of the three points in the visible image and mark them with the same point numbers associated with those in thermal image.
- Note: Suggested to choose three points far away from one another, so the triangle of can cover 70% of the image.
- Hit ‘apply’ to save the settings.
- Test if the rectangle can correctly surround the face, and perfect it by adjusting the three points.
- Thermal calibration (Configuration/Human Thermometer/Thermal Calibration)
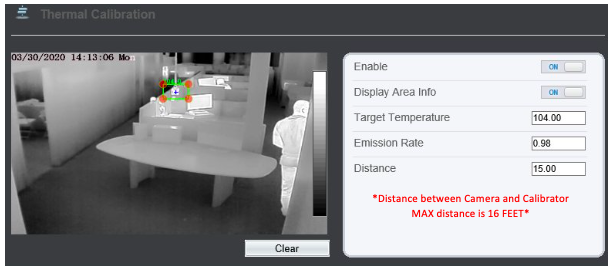
- Install the blackbody properly where the camera can see it (within the thermal image). The blackbody needs to be powered on for at least 20 mins to reach to a stable temperature.
- The Infrared Calibrator will ALWAYS display in CELSIUS; the stable temperature is ~40C
- Enable.
- If you turn on ‘Display Area Info’, the blackbody (Infrared Calibrator) will also be shown with temperature on thermal image.
- Draw box around your calibrator
- Target Temperature: If using Celsius leave as 40C, if using Fahrenheit change to 104F (Default)
- For Distance, put the real installation distance between the camera and Black Body (Infrared Calibrator). No more then 9-16 feet (3-5 meters). Distance is in Meters or Feet, depending what you selected under the Parameter Config menu.
- Keep the ‘Emission Rate’ as the default value.
- Hit ‘apply’ to save the settings.
