UN1A-16X8 and UN1A-32X16
Going beyond the Plug-and-Play port count
ULTRA-IP NVRs have a fixed number of Plug-and-Play ports on the rear panel. The maximum number of fully Plug-and-Play cameras supported by an ULTRA-IP NVR is the same as the number of Plug-and-Play ports on the rear panel. In addition, the maximum number of IP cameras that can be connected through the PoE switch on the rear panel is the same as the number of Plug-and-Play ports on the rear panel*.
For the UN1A-4X4 and UN1A-16X16XL, that is rather straightforward. Cameras can be connected as Plug-and- Play to the PnP ports. Cameras can be connected as “manual” configured cameras through either the PnP ports or the LAN/WAN network port. Either way, on these two models, the maximum number of connected cameras is exactly equal to the number of PnP ports on the rear panel. If any camera is connected via the LAN/WAN network port, that is one less camera that can be connected to one of the PnP ports.
The UN1A-16X8 and UN1A-32X16 are a different story. Each is capable of connecting up to twice the number of cameras as there are PnP ports on the rear panel. Given that a maximum of 8 cameras can be connected thought the PnP switch on the rear of the UN1A-16X8 and a maximum of 16 cameras* can be connected through the PnP switch on the rear of the UN1A-32X16, how are the additional 8/16 cameras connected? They must be connected through the Gb/s LAN/WAN network port on the rear panel of the NVR.
*Click on the images below to view in full screen.*
 *While additional cameras may be connected to the internal switch, as the switch capacity is 100Mb/s spreading that bandwidth across more than 16 cameras may reduce system performance and reliability.
Does this mean that for the additional 8/16 cameras, or any cameras connected though the LAN/WAN port there is no Plug-and-Play convenience? Not exactly. Depending on the network setup, if they are KT&C Plug- and-Play capable cameras, it is possible to quickly and conveniently set up and access those cameras.
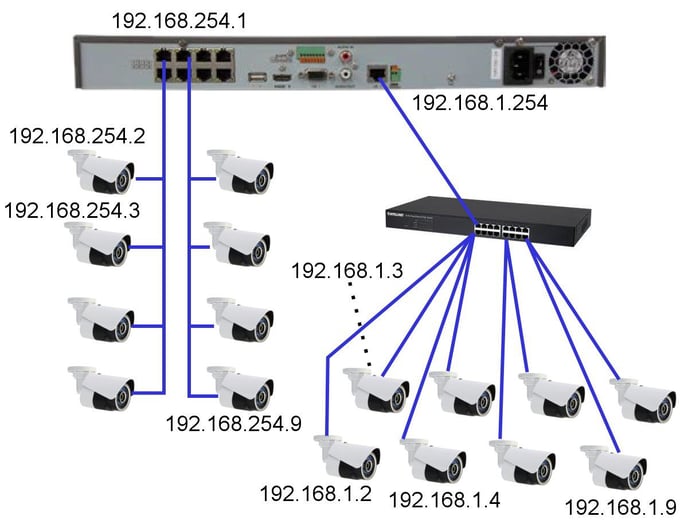
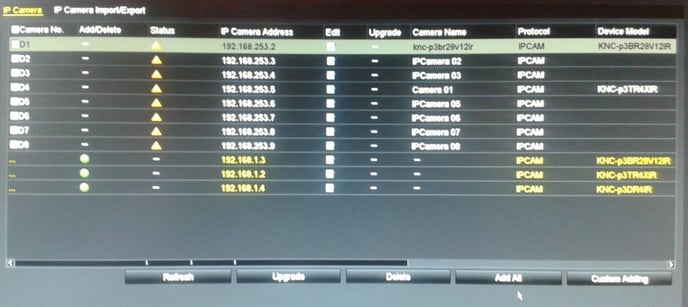
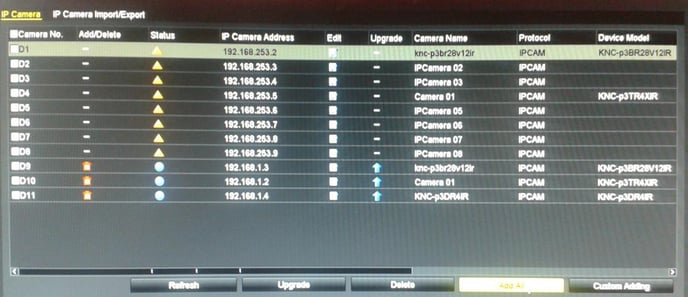
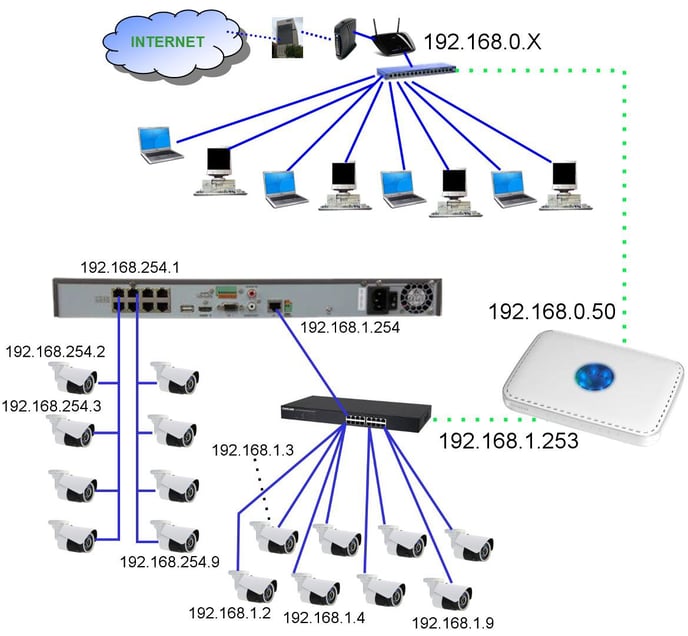
Consider this network connection setup. The Plug-and-Play PoE switch IP address is 192.168.254.1; the PnP IP cameras 1~8 are assigned addresses 192.168.254.2~192.168.254.9 respectively. Any cameras beyond those 8 must be powered separately (by PoE or 12VDC) and connected through a separate LAN switch (gigabit strongly recommended). Fortunately for ULTRA-IP PnP cameras, once the LAN/WAN port is assigned a static IP address it can discover attached ULTRA-IP PnP cameras and will assign them IP addresses. In this example, the LAN/WAN port is assigned an IP address of 192.168.1.254. The NVR automatically discovers and assigns the IP addresses 192.168.1.2~192.168.1.9 to the eight cameras on that port. Once this process has completed, those 8 cameras are available for ‘one click adding’ [Add All] to become cameras 9~16. At this point one has a working, stand- alone 16 camera NVR system. As an example:
Cameras 9~11 Added and Connected
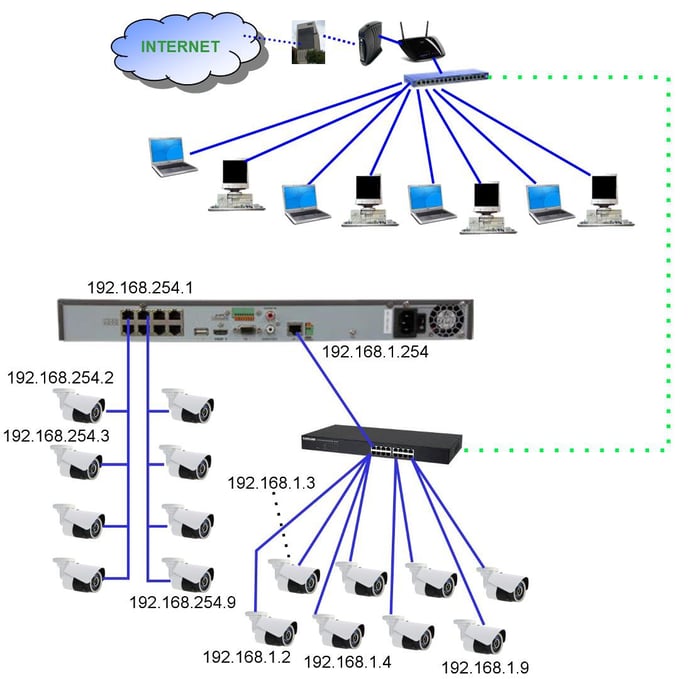
If this were a ‘stand alone’ system it would be complete. The NVR has local display for live and playback; additional monitoring PCs can be connected to the 192.168.1.0 network. However, in our modern ‘connected’ world local access alone is not sufficient. We need to be able to access this system remotely using ULTRA CMS or ULTRA Remote smart phone apps. To accomplish this, we must link the LAN/WAN port on the NVR with a network which has access to the Internet. Can we do this simply by connecting the auxiliary switch directly to an existing LAN/WAN as shown below?
While this may be possible, it is unlikely to work and may be unreliable. IF the existing network happens to also use the same addressing scheme as the LAN/WAN port on the NVR (e.g. 192.168.1.X), the two networks can be joined. However, there is nothing to prevent two devices from trying to use the same IP address (an address conflict). Camera network address are assigned by the NVR without regard to any other constraints. The DHCP host on the existing LAN also hands out DHCP addresses that might duplicate/conflict with camera addresses. There may also be manually assigned static IP addresses on that other network which conflict with the NVR itself or with the IP cameras (initially, or at some time in the future).
If the addressing scheme on the two networks is different, no communication between them can take place.
Trying to directly co-join these two networks is likely to be more trouble than it is worth in the long term. Still, the NVR needs a path to the Internet, and perhaps needs to be accessible from some or all of the PCs on the home/office LAN/WAN.
One simple way to connect two networks with different network numbering schemes is a router. A simple home/office router will likely suffice. The “LAN” side of the router connects to the auxiliary camera network switch. The router LAN port is assigned a compatible IP address (e.g. 192.168.1.253). The “WAN” side of the router is connected to the home/office LAN/WAN and is assigned a static IP address compatible with that network (e.g. 192.168.0.50). Since routers function as DHCP hosts, to avoid conflicts the DHCP function in the additional router should either be disabled, or restricted to a very limited address range, e.g. 192.168.1.245~ 192.168.1.252. This DHCP capability aids in the connection of wired or wireless PCs and other devices to that NVR/camera network for monitoring and diagnostic purposes.
Since routers also function as firewalls, we need to make the NVR accessible from the home/office LAN/WAN side. One way to do this is to indicate the IP address of the NVR (192.168.1.254) as being in the “DMZ” for the router. This completely exposes the DMZ device address to the “WAN”. From the home/office LAN/WAN 192.168.0.50 effectively becomes the IP address of the NVR.
Another way to set up access to the NVR through this router is using the automated “NAT” feature in the NVR. This will open up the IP ports through the AUXILIARY router that joins the secondary camera network with the home/office LAN/WAN. It will be necessary to manually configure the existing home/office LAN/WAN router to forward the necessary ports to the auxiliary router, so it can pass that traffic on to the NVR.
DDNS on the NVR should have no problems. Contact from the recorder to the DDNS server (presuming that the DNS information has been properly entered in all router and NVR network configuration settings) is outbound and should be unrestricted. Inbound, the DDNS name directs the communication to the site’s WAN IP address, and port access should be forwarded by the site’s WAN router onward to the auxiliary router, which in turn forwards the requests to the recorder.

